Hole 1
Par 4
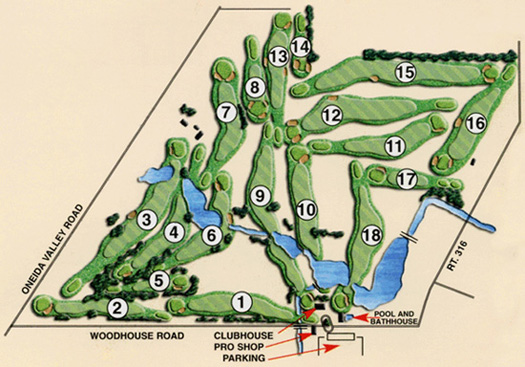
This difficult opening Par 4 usually plays into the prevailing wind, making it play longer than the indicated yardage. Players want to favor the right side to leave an open approach to the green that is guarded by a bunker in the front left.
Hole 2
Par 4
This straightaway Par 4 requires a straight drive to avoid the trees right and left. A well-struck tee shot leaves a mid to short iron to the slightly elevated green that slopes from the back to front.
Hole 3
Par 5
The first Par 5 on the course is reachable with a long solid drive in the fairway, if the player decides to go for the green in 2, you will have to avoid the large pond guarding the front left of the green. If you lay up, you must choose the proper club to avoid leaving yourself a long putt on this large green.
Hole 4
Par 4
The most difficult Par 4 on the course. A drive down the left side of the fairway leaves the best angle to attack this severely pinched green. A miss long right or left of the green is surely a bogey or worse.
Hole 5
Par 3
This slightly downhill Par 3 is fronted by a large bunker on the front right. A precisely struck tee shot is required to hold this shallow green. A slight fade is the shot of choice here.
Hole 6
Par 4
This short Par 4 presents two options from the tee. The shorter-hitter must lay up to the right of the white birch tree with a 180-yard tee shot. The longer hitter can knock a drive over the water and leave a short pitch to this small, elevated green. A definite birdie opportunity.
Hole 7
Par 4
Water and trees loom to the right off this dogleg left Par 4. A draw off the tee leaves a mid to short iron to a green that is guarded right and left by bunkers.
Hole 8
Par 3
This short-length Par 3 presents a good birdie opportunity.
Hole 9
Par 5
The outward nine concludes with a risk-reward Par 5. The landing area for the tee shot ends 280 yards from the tee. From there, the player must choose whether to lay up or go for the green from 230 yards off a downhill, side hill lie. Two water hazards front the green to the right and left, allowing a shot to run up onto the green.
Hole 10
Par 4
This slightly uphill Par 4 requires a short carry over water from the tee. An extra club may be required for the approach to carry the bunker fronting the green.
Hole 11
Par 4
A gentle dogleg left Par 4. Longer hitters may try to cut the corner, leaving a short approach to the green. An accurate tee ball is a must to avoid trees right and left. Beware of the back right hole location, for going at this pin often leads to a bogey if the shot is slightly off line.
Hole 12
Par 5
Birdie Time! This short Par 5 presents the best birdie opportunity on the back nine. Avoid the fairway bunker off the tee and the green is easily reachable in two.
Hole 13
Par 4
A straightaway Par 4 with fairway bunkers to the left and right. The front right of the green is guarded by a large, deep bunker. Another great birdie opportunity.
Hole 14
Par 3
Possibly the most difficult Par 3 on the course. This medium-length one-shooter is guarded by bunkers to the left, front, and right. The green is difficult to hold with a mid-to-long iron, so par is a good score here.
Hole 15
Par 5
The tee shot on this Par 5 must avoid OB left, trees, and a bunker to the right. If well struck, the green may be reached in two. If you lay up, be sure to choose the proper club for your third shot into the long, large green.
Hole 16
Par 4
The start of Kanon Valley’s Amen Corner. While this Par 4 looks easy on paper, the landing area is tightened by trees on the left and a fairway bunker to the right. The green slopes off of the front left bunker, which makes holding the approach shot very difficult.
Hole 17
Par 3
The longest Par 3 on the course over 220 yards from the back tee, this hole plays into the prevailing wind, forcing most players to use a fairway metal off the tee. Par on this hole is a great score!
Hole 18
Par 4
Kanon Valley’s signature hole. A picturesque downhill, dogleg right Par 4. Large trees guard the right and left sides of the fairway, making a precise tee shot a must. The second shot is a forced carry over water to a severely undulating green.
Course Map